
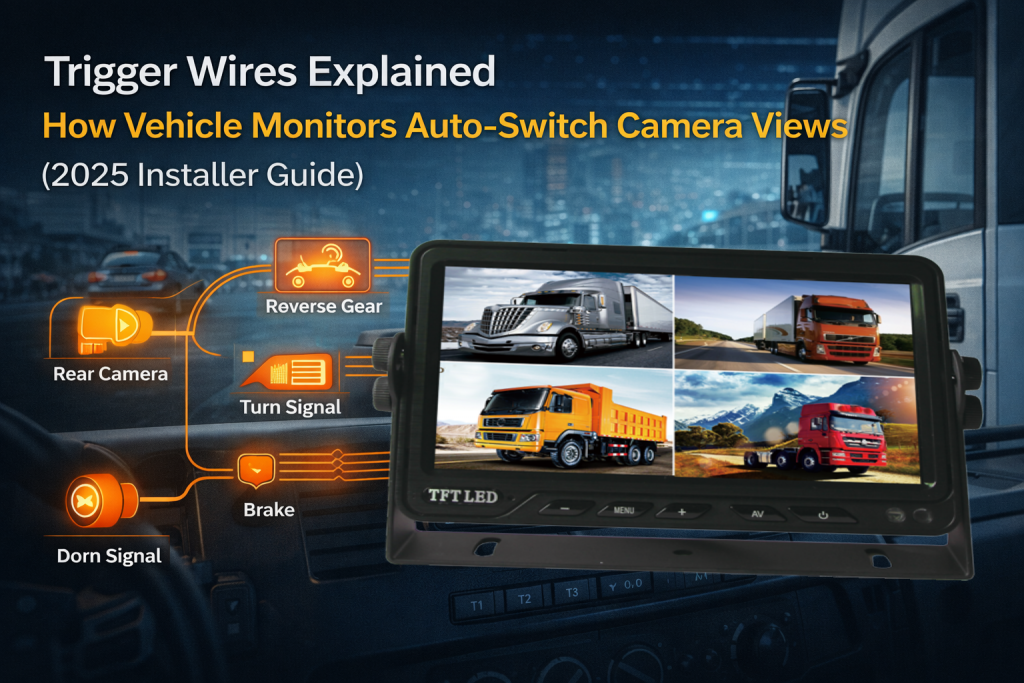
Trigger wires let a vehicle monitor automatically switch to the correct camera view when specific vehicle signals occur—most commonly reverse gear, turn signals, or braking. If you’re installing a 2–4 camera system, using trigger wires correctly improves driver reaction time and reduces blind-spot risk, without the driver pressing any buttons. Many commercial monitors support multiple triggers and multi-format inputs (AHD/CVBS), making them ideal for fleet upgrades.
For fleets that prefer wired AI blind-spot detection and IP69K durability, see our 10.1″ AI BSD monitor system: https://xinvisualelectronics.com/product/10-1-inch-bsd-ai-vehicle-monitor/
If your application needs a rearview mirror replacement display with dual camera support and reverse trigger switching, see our 12.3″ electronic mirror monitor: https://xinvisualelectronics.com/product/electronic-mirror-monitor/
Why Trigger Wires Matter for Commercial Fleets
In real fleet operation, drivers don’t want to manually change channels while turning, reversing, or maneuvering in tight spaces. Trigger wires solve this by giving the driver the right view automatically:
-
Reverse gear → rear camera appears instantly
-
Left turn signal → left-side camera appears
-
Right turn signal → right-side camera appears
-
Brake / other signal → front/aux camera appears (optional)
This is especially useful for:
-
Trucks + trailers
-
Buses and shuttle fleets
-
Forklifts and yard trucks
-
Construction/agriculture machinery
Many Xinvisual monitors are designed with these trigger functions for multi-camera use cases.
How Trigger Wires Work
A trigger wire is a signal input to the monitor. When it receives the correct voltage signal from the vehicle (commonly 12V/24V depending on wiring design), the monitor changes display priority to a specific camera channel.
Most common trigger sources
-
Reverse lamp wire (reverse gear)
-
Turn signal wire (left/right indicator)
-
Brake lamp wire
-
Door signal / PTO / custom fleet signal (special vehicles)
What the driver experiences
-
The monitor shows the needed view only when the event happens
-
After the event ends, the monitor returns to the previous view (depending on monitor settings)
Many commercial monitors include “reverse delay” and “power-off memory,” so the switching feels smooth and consistent.
Key Takeaways
-
Trigger wires enable automatic camera switching on vehicle monitors based on signals like reverse gear and turn indicators.
-
The most common setup is Reverse = rear camera, Left/Right turn = side cameras, and an optional Brake/Custom trigger = front/aux view.
-
Correct wiring depends on stable power and grounding—poor ground or weak signal is a common cause of missed switching.
-
Use proper connectors and protected cable routing to reduce noise, vibration issues, and long-term failures in commercial vehicles.
-
For fleet upgrades, hybrid AHD/CVBS monitors can simplify installations when cameras use mixed video formats.
Recommended monitors for fleet installs: If you need a rugged multi-camera solution, consider our 10.1″ BSD AI Vehicle Monitor. For a mirror-style display, see our 12.3″ Electronic Mirror Monitor. For fast retrofits, check our 7″ Split Digital Wireless DVR HD Monitor.
Trigger Wire Mapping Table
Use this table as a reference for typical 3–4 trigger monitor setups.
| Driving Event | Vehicle Signal Source | Monitor Trigger Input | Camera View Shown |
|---|---|---|---|
| Reverse | Reverse lamp wire | Trigger 1 (Reverse) | Rear camera |
| Left turn | Left indicator wire | Trigger 2 (Left) | Left-side camera |
| Right turn | Right indicator wire | Trigger 3 (Right) | Right-side camera |
| Brake / custom | Brake lamp / custom signal | Trigger 4 (Optional) | Front / auxiliary camera |
Installer tip: Trigger inputs are typically activated by vehicle signal voltage (e.g., reverse lamp or indicator signal). Always follow the wiring diagram of your specific monitor model and test each trigger (reverse/left/right) before delivery.
Important: Different monitor models may label trigger inputs differently. Always follow the wiring diagram for your exact monitor model.
Wiring Best Practices
1) Use the correct power and grounding
Commercial monitors often support wide voltage input (DC 12–36V), which is ideal for mixed fleets and heavy-duty vehicles.
Best practices:
-
Use a reliable ground point (clean metal contact)
-
Add a fuse close to the power source
-
Avoid sharing noisy grounds with motors or high-current devices
2) Keep trigger wires clean and stable
Trigger problems usually come from:
-
weak signal source
-
loose splice
-
inconsistent voltage
-
signal noise from poor grounding
Tips:
-
Use proper connectors (crimp + heat shrink)
-
Avoid twisting bare wires and taping only
-
Route trigger wires away from high-power lines when possible
3) Choose the right monitor type for the environment
If your vehicles are washed often or operate in wet/dusty sites, consider rugged monitors with waterproof protection and anti-shock designs.
4) Confirm camera format compatibility (AHD/CVBS)
If you’re upgrading a fleet gradually, you may run mixed camera formats. Some monitors support hybrid signals (CVBS + AHD 720P/960P/1080P), making upgrades easier without replacing everything at once.
Example: 4-Camera Fleet Setup
A common fleet setup uses:
-
Rear camera (reverse safety)
-
Left camera (blind spot)
-
Right camera (blind spot)
-
Front camera (tight yard / moving off / custom use)
A 4-channel monitor with trigger wires can:
-
auto-switch to rear view when reversing
-
auto-switch to side views when turning
-
show quad view when desired (optional on certain monitors)
Xinvisual offers multi-input monitors designed specifically for these use cases (up to 4 inputs + trigger functions).
Installer Checklist
Before installation
-
Confirm monitor voltage range matches vehicle (12V/24V fleet)
-
Confirm camera format (AHD or CVBS) and monitor compatibility
-
Plan camera positions and cable routing
During installation
-
Fuse installed near power source
-
Solid ground point, cleaned and tightened
-
Trigger wires connected to correct signal sources (reverse/turn/brake)
-
Connections protected (heat shrink / waterproof connectors)
After installation
-
Test reverse switching
-
Test left/right switching
-
Confirm return-to-previous-view behavior
-
Night test (glare and visibility check)
-
Drive test in real traffic or yard conditions
Key Takeaways
-
Trigger wires let a monitor auto-switch to the correct camera view (reverse, turn, brake).
-
Good trigger wiring improves safety because drivers don’t need to touch controls while maneuvering.
-
Use stable power/grounding and proper connectors to prevent flicker or missed triggers.
-
Hybrid AHD/CVBS monitors simplify fleet upgrades and mixed-format systems.
FAQ
1) What is a trigger wire on a vehicle monitor?
A trigger wire is a signal input that tells the monitor to switch to a specific camera channel when an event happens (reverse, turn, brake).
2) Which trigger is most important?
Reverse trigger is usually the most important because it automatically shows the rear view during reversing.
3) Can a monitor support multiple triggers?
Yes—many commercial monitors support multiple trigger wires for reverse and side cameras.
4) Why does the monitor not switch when I turn?
Common causes: wrong signal source, weak voltage, loose splice, poor grounding, or trigger wire connected to the wrong input.
5) Do I need AHD or CVBS for fleet monitors?
AHD provides higher clarity. If you’re upgrading gradually, a monitor that supports both AHD and CVBS can be a practical choice.
6) Can trigger wires be used on forklifts?
Yes. Trigger logic can be used for reverse or custom signals depending on the forklift wiring design and safety requirements.
7) What’s the best monitor for harsh environments?
Choose a rugged monitor designed for vibration and challenging environments—especially if washdown or dust is common.
Call to Action
If you’re building a multi-camera fleet system (rear + side + front), Xinvisual Electronics can provide compatible solutions including AHD/CVBS monitors with trigger wires, HD cameras, and complete wired kits for commercial vehicles.
Contact us with your vehicle type and camera plan, and we’ll recommend the right monitor and wiring configuration.